

01. Check WAN and LAN connections
Physical connections are an oft-overlooked common culprit. Check all wireless access point (AP) or wireless router ports to ensure that Ethernet cables are inserted tightly and link status LEDs are green at both ends. If not:
Verify that devices at both ends of each Ethernet cable are powered on and that ports are enabled. For example, your AP may be connected to a wall port that is disabled, or the upstream switch or modem may be off.
Try swapping Ethernet cables to isolate a damaged cable or connector.
Check your AP or router manual to ensure that you’re using the right type of cable. For example, Internet/WAN ports may require crossover cables.
Connect another Ethernet-capable device, such as a laptop, to the affected AP or router port. If link status LEDs change, the device that you just replaced may be failing link auto-negotiation. Check port configurations at both ends and reconfigure as needed to match speed and duplex mode.
02. Verify wireless adapter
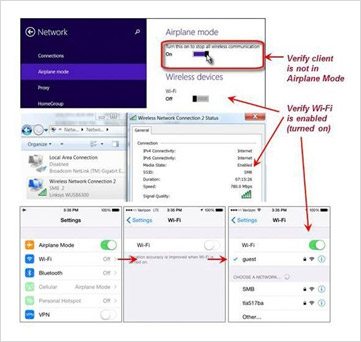
It might seem obvious, but it’s important to ensure the client’s Wi-Fi adapter used for network troubleshooting is enabled and ready to connect.
When using a Windows client, select your wireless network adapter from the Network Connections Control Panel and check to see if its status is Enabled. If not, right-click to enable the connection. If this fails when using a laptop, look for a function key or physical button or slider-switch to take the laptop out of airplane mode. If this fails when using a removable client such
as a USB adapter, remove and re-insert it.
When using an Apple iOS client, use the Settings app to verify that your iPhone or iPad is not in airplane mode and that Wi-Fi is on and ready to connect. For further iOS client troubleshooting, see Part 2 of this series.
On an Android client, use the Settings app in a similar manner to verify that your smartphone or tablet is not in airplane mode and that Wi-Fi is on. For further Android client troubleshooting, see Part 3 of this series.

03. Verify AP and router settings
Use your wireless access point or router’s administrative GUI to verify network settings for the wireless network service set identifier (SSID) to which your Wi-Fi client is trying to connect.
Locate the SSID that you’re troubleshooting. On a basic wireless router, there may be just one SSID, or one for each radio band (2.4 GHz and 5 GHz). On a small business or enterprise AP, there may be several SSIDs used to segregate wireless clients and their traffic.
Identify the IP subnet [and, if applicable, virtual LAN (VLAN) ID] assigned to that SSID. Upon successful connection, your Wi-Fi client should receive a local IP address from this subnet.
Identify the router or AP’s own local IP address that should be reachable through this subnet (and, if applicable, VLAN).
Check your router’s events log or status GUI to verify that an IP address from this subnet is indeed assigned to your Wi-Fi client when it connects.

04. Verify TCP/IP settings
Although we describe using Windows to manage wireless connections here, troubleshooting is conceptually similar when using other kinds of Wi-Fi clients.
Open the network connections control panel and select your wireless network adapter. If the status is still Disabled, return to step 2.
If status is Not Connected, select your wireless network’s SSID and click Connect. If your network’s SSID does not appear in the list or you cannot connect to your network, go to step 8 to debug wireless settings.
While attempting to connect, status may change briefly to Authenticating or Acquiring Network Address, then Connected. At that point, use Status/Support to determine the client’s assigned IP address. If the client’s IP is 0.0.0.0 or 169.254.x.x, click Diagnose. If that persists, go to step 8.
Otherwise, if the Wi-Fi client’s IP address is not in your AP or router’s subnet, use the Properties/Internet (TCP/IP) panel to reconfigure the connection to get an address automatically and repeat step 4.
05. Verify network connection with Ping
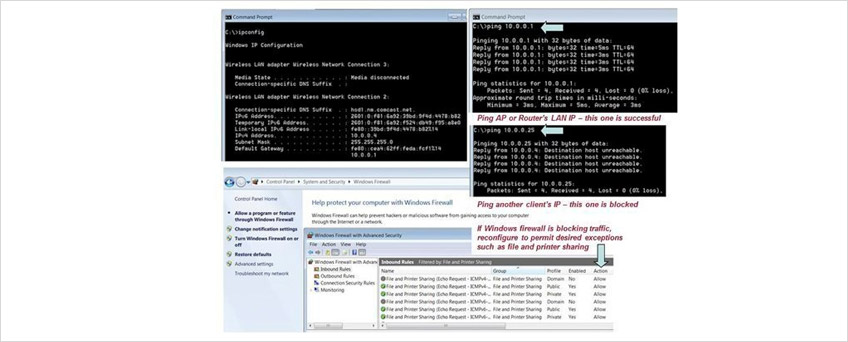
Once your wireless client has a valid IP address, use ping to verify network connectivity.
Run a Command Prompt window from the wireless client’s Start menu and use it to ping your AP or router’s IP address with the Internet Control Message Protocol as shown in Figure 5.
If pinging your AP or router repeatedly fails, skip to step 6.
If pinging your AP or router is successful, then ping any other wired or wireless LAN client that you wish to share files or printers with. If that ping fails, then the destination may be using a firewall to block incoming messages.
After disabling the destination’s Windows firewall, ping again. If ping is now successful, then the firewall you disabled may also be blocking Windows network protocols. Reconfigure the firewall to permit the traffic you want to exchange between LAN clients. For example, re-enable the firewall and permit inbound file and printer sharing.
06. Check wireless-specific issues
If your wireless client still cannot connect, get a valid IP address or ping your AP or router, then it’s time to consider wireless-specific problems.
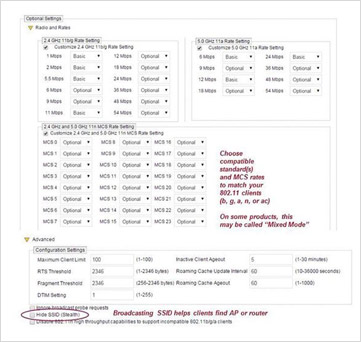
The wireless AP or router and client must use compatible 802.11 standards and the same network name (SSID). Use your AP or router’s admin GUI to view WLAN settings and compare them to your client’s wireless connection parameters.
If your SSID does not appear in the Client’s Available Networks list, enable SSID broadcasts on your AP or router. Alternatively, add the SSID to your client’s Wireless Networks list, allowing devices to connect even if the SSID is hidden. Be sure to match the SSID exactly, including capitalization.
802.11ac, dual-band 802.11n and older 802.11a clients can connect to 802.11ac or 802.11n APs or routers using channels in the 5 GHz band.
802.11n and older 802.11b/g clients can also connect to 802.11n APs or routers using channels in the 2.4 GHz band.
To connect older 802.11a or 802.11b/g clients, enable Mixed Mode and slower modulation and coding scheme rates on your AP or router. For example, to connect to 802.11b clients, at least the 11 Mbps rate must be enabled. To connect to 802.11g clients, at least the 54 Mbps rate must be supported. Even slow rates are needed to connect to old clients over longer distances.
07. Look for a security mismatch
If a matched wireless client and AP or router can “hear” each other but still can’t connect or exchange traffic, look for a security mismatch.
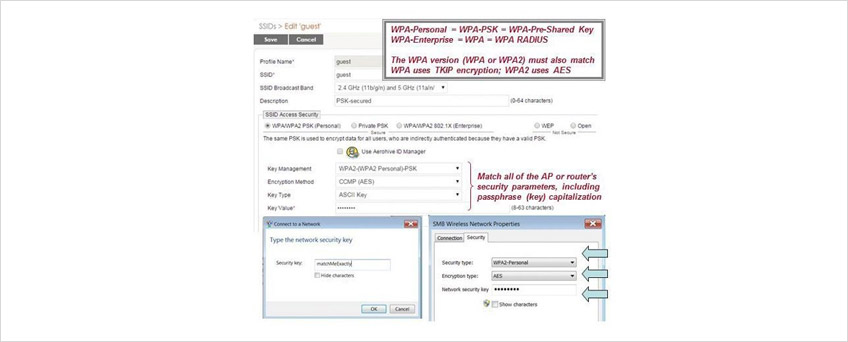
The client must support the security mode the AP or router requires: Open, WEP, WPA or WPA2. Unless the WLAN is open (unsecured), the AP or router and client must also have (or dynamically receive) the same keys used to encrypt traffic between them. Compare your AP or router’s WLAN security settings to your client’s wireless connection properties to match them.
If your AP or router uses WEP, set the client’s encryption to WEP and match the authentication type (open or shared). Copy the AP or router’s first WEP key to the client, translating from ASCII to hex if needed.
If your AP or router uses WPA-Personal, set the client’s authentication to WPA-PSK and match the encryption type (TKIP). Enter the same passphrase on both devices Remember: Capitalization counts!
If your AP or router uses WPA2-Personal, set the client’s authentication to WPA2-PSK, match the encryption type (AES) and enter the same passphrase on both devices. If you must support both WPA and WPA2 clients, set your AP or router to allow both TKIP and AES encryption.
If your AP or router uses WPA or WPA2-Enterprise, set the client’s authentication to WPA or WPA2 respectively, match the encryption type and continue 802.1X set-up in step 8.
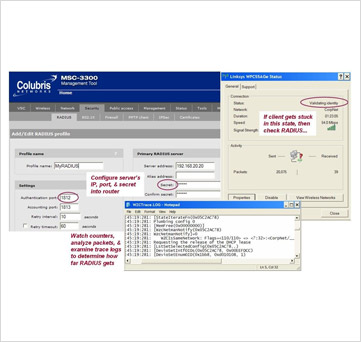
08. Ensure RADIUS is working
WPA and WPA2-Enterprise log the client into the network and deliver encryption keys using an 802.1X-capable RADIUS server. If you do not already have a RADIUS server, consult this tip. Otherwise, try the following:
Reconfigure your AP or router and server with a matching RADIUS secret.
Reconfigure your RADIUS server to accept requests from your AP or router.
Use ping to verify AP or router-to-RADIUS server network reachability.
4Watch LAN packet counters to verify that RADIUS is being sent, or use a LAN analyzer debug RADIUS protocol issues.
09. Check 802.1X EAP and user login
If RADIUS is working but the client’s access requests are rejected, look for an 802.1X Extensible Authentication Protocol (EAP) or user login problem.
Your client must support one of the EAP types your server requires and must supply a valid login and password, token, certificate or other kind of credential.
If your server requires EAP-TLS, select Smart Card or other Certificate on the client’s Network Properties/Authentication panel.
If your server requires PEAP, select Protected EAP on that panel.
If your server requires EAP-TTLS or EAP-FAST, install a third-party 802.1X Supplicant program like Cisco’s Trust Agent on the client.
Make sure that client and server EAP-specific properties match, including server certificate Trusted Root Authority, server domain name (optional) and tunneled authentication method (e.g., EAP-MSCHAPv2, EAP-GTC).
If you are prompted to accept the server’s certificate at connect time, examine the certificate carefully, verifying issuer and identity. Never add an unrecognized or suspicious certificate to your trusted list.
If EAP-TLS problems persist, use a Web browser to inspect the client’s certificate and make sure the certificate is valid (e.g., not expired).
If PEAP problems persist, use CHAP Configure to prevent Windows auto-logon and enter a valid username and password when prompted.
If you still haven’t spotted the problem, consult your RADIUS server’s 802.1X documentation for EAP configuration and debugging hints.

10. Check intermittent network connectivity issues
Finally, if your wireless client connects and pings successfully, but encounters intermittent network connectivity problems (e.g., some pings work, some fail), you may be experiencing poor signal strength, RF interference, or disconnection caused by AP roaming. See our Fixing wireless LAN problems tip for troubleshooting hints.
How to Troubleshoot When You Have No Wireless Connection
Is there a red X over the wireless network icon in the Windows taskbar? What about on your phone – does it report that there isn’t a wireless connection? Maybe you’re told that there are no wireless networks available (when you know there are).
Wireless connection problems can be incredibly frustrating, especially when they happen at the worst possible time, like when you need to send an email to meet a deadline and are working on the road with no access to tech support.
Don’t worry, though, because Wi-Fi problems can often be fixed rather easily. We’ll go over all your options below.
Note: Some other common types of Wi-Fi issues, especially for remote workers, include dropped signals and spotty connections, a valid wireless connection but no internet connection, and wireless and internet connection but no VPN access.
01. Make Sure Wi-Fi Is Enabled on the Device
On some devices, wireless capabilities can be turned on and off via a physical switch on the edge of the device. At the same time, most all devices let you toggle Wi-Fi on/off through the software.
Check both of these areas first, because that will save you lots of troubleshooting time if the wireless connection is simply disabled.
Check the Wi-Fi Switch
If you’re on a laptop, look for a hardware switch or special function key that can turn the wireless radio on and off. It’s relatively easy to flip it by accident, or maybe you did it on purpose and forgot. Either way, toggle this switch or hit that function key to see if this is the case.
If you’re using a USB wireless network adapter, make sure it’s plugged in correctly. Try a different USB port to be sure the port isn’t to blame.
Enable Wi-Fi in the Settings
Another place to look is within the device’s settings. You might need to do this on your phone, desktop, laptop, Xbox, you name it – anything that can turn Wi-Fi on and off will have an option to do so.
For example, in Windows, within Control Panel, look for the “Power Options” settings and choose Change advanced power settings to make sure the Wireless Adapter Settings option is not set to a “power savings” mode. Anything but “Maximum Performance” might negatively affect the adapter’s performance and affect the connection.
Also, check for a disabled wireless adapter from the list of network connections in Control Panel. To do that, execute the control netconnections command in Run or Command Prompt, and check for any red networks listed there.
Yet another place where system settings could be causing no Wi-Fi connection is if the wireless adapter has been disabled in Device Manager. You can easily enable the device again if that’s the cause of the problem.
If you have an iPhone, iPad, or Android device that shows no wireless connection, open the Settings app and find the Wi-Fi option. In there, make sure the Wi-Fi setting is enabled (it’s green when enabled on iOS, and blue on most Androids).

Remote root in directive’s wireless video bridge: a tale of rage and despair
01. Getting to Know the Linksys WVBR0-25
As was the case with U-Verse, DirecTV also has wireless cable box options for making installation easier. The Wireless Genie Mini (C41W) cable box pairs with a wireless video bridge to communicate with the main Genie DVR. The wireless video bridge in this case was a Linksys WVBR0-25. I had a bad experience with a wireless video bridge like this in the past, so it seemed like a good place to start looking for problems. I started out by trying to browse to the web server on the device. I expected to find a login page of some sort. What I found instead was a wall of text streaming before my eyes.
Instead of a login prompt or an index page of any kind, I was presented with the output of several diagnostic scripts containing just about everything you could want to know about the bridge, including the WPS pin, connected clients, running processes, and much more. This by itself is pretty bad as far as information disclosure goes, considering there was no authentication needed to get to this information, but I continued looking through it anyway. About halfway down the page, it started spitting out the contents of log files, and while scanning through those I saw something that made me stop dead in my tracks. With teeth clenching and knuckles turning white, I managed to get out a strained “WHAT…IS…THAT??” before attempting to confirm my suspicion.
02. The Easiest Command Injection Ever
A few lines in this log file, prepended with sys_cmd, seemed to indicate that they were using my IP address and user-agent in a system command to create an MD5 hash. Ostensibly, this is used as some form of access logging or tracking functionality. The logs showed the exact command that was being run and the subsequent output of that command. The problem here, however, is that users have complete control over what they want to send as a user-agent header. I surmised that if the device isn’t properly sanitizing the user-agent it is given, it would be sending untrusted data directly to the system for execution. There’s no way that could be the case though, right?
Thanks to the verbose logging on this page I could see that changing my user-agent to “; id; uname -a #” had indeed changed the syntax of the command to be executed. The return value also showed the device had happily executed my new commands and executed them as the root user, too! No login prompt. No input sanitization. Very helpful, verbose output. It literally took 30 seconds of looking at this device to find and verify an unauthenticated remote root command injection vulnerability. It was at this point that I became pretty frustrated. The vendors involved here should have had some form of secure development to prevent bugs like this from shipping. More than that, we as security practitioners have failed to affect the changes needed in the industry to prevent these simple yet impactful bugs from reaching unsuspecting consumers. So, once I finally managed to regain my composure, I decided to buy one of these off eBay to tear apart and figure out exactly what was going on.
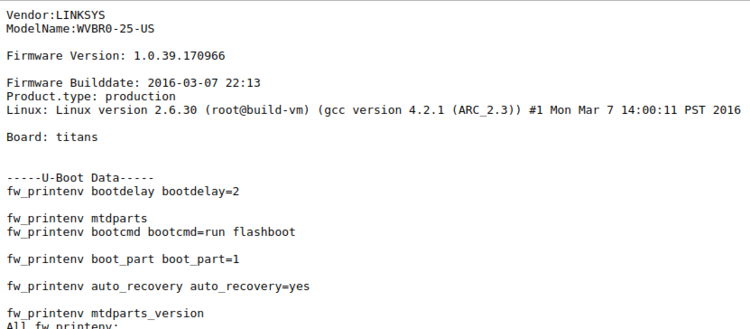
03. Examining the Firmware
The device was running a lighttpd web server, and as defined in its configuration file, browsing to the root of the web site would result in /dispatcher.cgi?template=SysInfo.asp being rendered. The SysInfo.asp file was the page responsible for displaying all the diagnostic output I was seeing. It also showed dispatcher.cgi was actually a symbolic link to apply.cgi, which itself is a compiled ARC executable file used as kind of a “do everything” agent for the web server. It was in apply.cgi that I found the actual root cause.